If you are exploring AWS Amplify the same way that I am, you might be continuously setting up new projects and trying out all the different libraries that are available for iOS. This means having to go back to the docs and search around for each of the same commands that need to be entered into the terminal when setting up the project for the first time. Since
Amplify is so straight forward to use, I don't really need help using the services, but setting them up isn't something that I have, or want to, memorize.
In this article, I have laid out all the steps that are required to get up and running with any combination of libraries with their default configuration. This will be the same article that we can look back to see which pods need to be added to use a library or which categories need to be added to Amplify to configure our backend.
Prerequisites
- • Sign up with an AWS Account (Not required for DataStore w/o backend)
- • Install Node.js version 10 or higher
- • Install Xcode version 10.2 or later
- • Install CocoaPods
- • Install Amplify CLI version 4.21.0 or later by running:
npm install -g @aws-amplify/cliInstallation Using Cocoapods
Open your terminal and run the following:
pod initNow that our project contains a Podfile, go ahead and open it in your favorite editor.
Once the Podfile is open, make sure that a platform is specified.
platform :ios, '14.0'Note
Keep in mind that the platform should be set to iOS 11 or higher or else Amplify won't be able to properly install.
Add any combination of these Podfile snippets to install the desired library:
Analytics
pod 'Amplify'
pod 'AmplifyPlugins/AWSPinpointAnalyticsPlugin'
pod 'AmplifyPlugins/AWSCognitoAuthPlugin'
API (GraphQL)
pod 'Amplify'
pod 'AmplifyPlugins/AWSAPIPlugin'
API (REST)
pod 'Amplify'
pod 'AmplifyPlugins/AWSCognitoAuthPlugin'
pod 'AmplifyPlugins/AWSAPIPlugin'
Authentication
pod 'Amplify'
pod 'AmplifyPlugins/AWSCognitoAuthPlugin'
DataStore (w/o API)
pod 'Amplify'
pod 'AmplifyPlugins/AWSDataStorePlugin'
Note If you want to use the Run Script method to handle model generation and configuration file setup, you should also include the following pod:pod 'Amplify/Tools'
DataStore (w/ API)
pod 'Amplify'
pod 'AmplifyPlugins/AWSAPIPlugin'
pod 'AmplifyPlugins/AWSDataStorePlugin'
Note If you want to use the Run Script method to handle model generation and configuration file setup, you should also include the following pod:pod 'Amplify/Tools'
Predictions
pod 'Amplify'
pod 'AmplifyPlugins/AWSCognitoAuthPlugin'
pod 'AWSPredictionsPlugin'
pod 'CoreMLPredictionsPlugin'
Storage
pod 'Amplify'
pod 'AmplifyPlugins/AWSS3StoragePlugin'
pod 'AmplifyPlugins/AWSCognitoAuthPlugin'
The entire file should look something like this:
platform :ios, '14.0'

target 'My-App' do
  use_frameworks!

  # Pods for My-App
  pod 'Amplify'
  pod 'Amplify/Tools'
  pod 'AmplifyPlugins/AWSDataStorePlugin'
end
Note
The code snippet above is a good example for an app that needs to use AWS Amplify DataStore as a persistence layer (no backend).
Next we will start the installation of the pods by running the following in the Terminal:
pod install --repo-updateNote
It is recommended that you close Xcode while the pods are installed.
Category Configuration
For most of the libraries (everything excluding DataStore), an AWS account will be required to configure your project with a category. This means that you can potentially choose between setting up your project in the Terminal, or by using a Run Script in Xcode.
Using Terminal
In order to have your services synced with the backend, you will need to configure Amplify to sync with your AWS account if it isn't already. Run the following in the terminal:
amplify configureYou will also need to make sure that your project is ready to work with Amplify by running the following:
amplify initNow that your project is ready to work with Amplify, run each of the following commands for each category you would like to add to your app:
Analytics
amplify add analytics
API (DataStore)
amplify add api
Note
You would run this same command whether you are using GraphQL or a REST API. This step also encompasses DataStore since API is used to sync DataStore to the backend.
GraphQL
If you're using GraphQL and have already configured your model schema, run the following:
amplify codegen models
The generated models can be found at amplify/generated/models and should be dragged and dropped into Xcode as part of your project.
Authentication
amplify add auth
Predictions
amplify add predictions
Storage
amplify add storage
When running one of these commands to add a category to your app, you will be prompted to answer a series of questions about how you would like the service to be configured. I recommend continually pressing Enter for all applicable questions. This will provide the default answer to each question and will configure your project with all the default settings.
After all the desired categories have been added to your app and properly configured, simply run the following:
amplify pushOnce your services have been properly configured and synced with the backend, we can drag the configuration files into our project. We need to add both amplifyconfiguration.json and awsconfiguration.json to Xcode, both of which should be in the root directory of your project. Simply drag and drop them into the project navigator pane or use the + icon at the bottom left to Add File to "My-App".
Your project should now be properly configured with a backend Amplify app 🥳
Using a Run Script
Using the Run Script method is a great alternative for anyone that is interested in using Amplify DataStore, without creating an AWS account. It's also great because the script adds the configuration files to your project automatically and gives you the option of generating GraphQL models with ease.
Add a new run script to the project so that the Amplify Tools can perform some magic in the background and configure our project for us.
Open up Build Phases
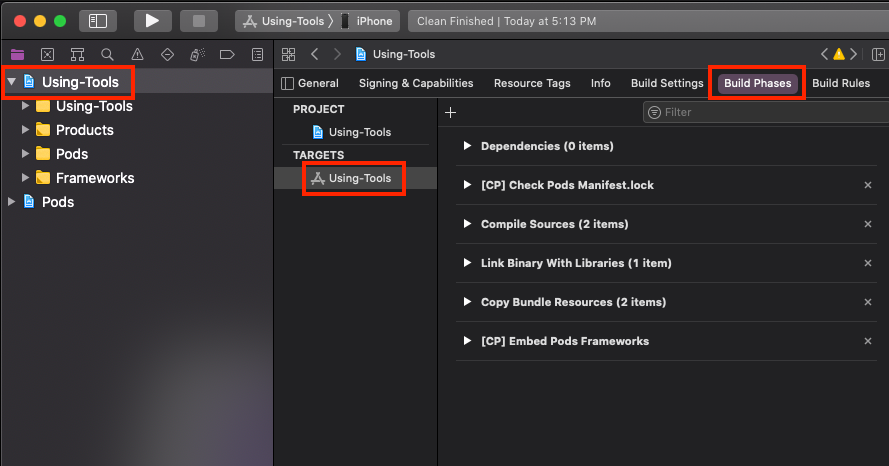
Create a new Run Script Phase
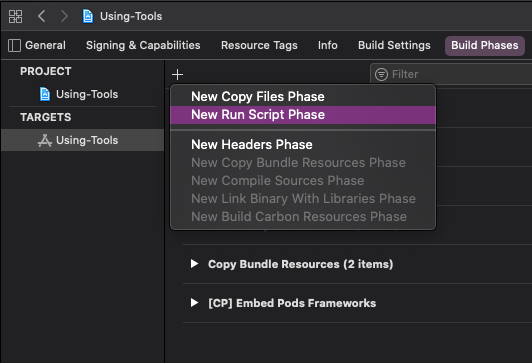
Drag the new Run Script Phase above the Compile Sources phase.
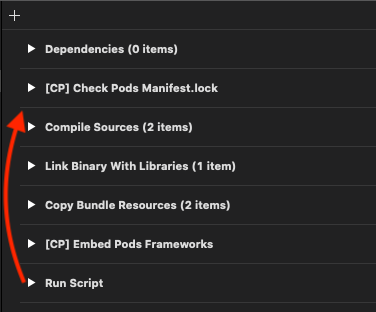
Rename the new Run Script Phase to "Run Amplify Tools".
Add the following line to the "Run Amplify Tools" script area:
"${PODS_ROOT}/AmplifyTools/amplify-tools.sh"Your Build Phases area should now look like this:

Now simply build the project.
Cmd + BNote
If you run into any errors during this build, try cleaning the project (Cmd + Shift + K) and building again (Cmd + B).
You're all set to configure your GraphQL schema and generate your models 😉
Configuring Plugins
The last thing we will need to do is configure the plugins for each of the services we will be using. Before we do that, let's add a configure Amplify method to our app:
import Amplify
import AmplifyPlugins

func configureAmplify() {
    do {
        // Plugins


        try Amplify.configure()
        print("Amplify configured 🥳")

    } catch {
        print("Failed to configure Amplify", error)
    }
}
Note
It doesn't matter where this method gets called, but it should happen before any of Amplify's services are used. In order to ensure Amplify will be configured before it is used, you can call this method in theAppDelegate didFinishLaunchingWithOptionsmethod or in your SwiftUIApp initmethod.
Now we just add the plugins before we run try Amplify.configure() and we will be good to go.
Analytics
// Analytics
try Amplify.add(plugin: AWSCognitoAuthPlugin())
try Amplify.add(plugin: AWSPinpointAnalyticsPlugin())
API (GraphQL)
// API
let models = AmplifyModels()
try Amplify.add(plugin: AWSAPIPlugin(modelRegistration: models))
API (REST)
// API
try Amplify.add(plugin: AWSCognitoAuthPlugin())
try Amplify.add(plugin: AWSAPIPlugin())
Authentication
// Auth
try Amplify.add(plugin: AWSCognitoAuthPlugin())
DataStore (w/o API)
// DataStore
let models = AmplifyModels()
try Amplify.add(plugin: AWSDataStorePlugin(modelRegistration: models))
DataStore (w/ API)
// DataStore
let models = AmplifyModels()
try Amplify.add(plugin: AWSDataStorePlugin(modelRegistration: models))
try Amplify.add(plugin: AWSAPIPlugin(modelRegistration: models))
Predictions
// Predictions
try Amplify.add(plugin: AWSCognitoAuthPlugin())
try Amplify.add(plugin: AWSPredictionsPlugin())
Storage
// Storage
try Amplify.add(plugin: AWSCognitoAuthPlugin())
try Amplify.add(plugin: AWSS3StoragePlugin())
That's pretty much it. Now we can go play with all our different services 🚀
Conclusion
That should be everything needed to serve as a quick start reference to getting started with AWS Amplify. If you need something more detailed documentation, be sure to check out the Amplify Docs. They are very well written and straightforward 😁
Now go out there, and keep coding passionately!